Enrolment Interviews is one of TrackEd’s built-in data collection tools. It gives you a one-page enrolment interview profile, set up for your school, that sits one click away from the student profile. Schools use it most often for the move from primary to secondary, capturing everything gathered during enrolment in one structured place.
You set the labels up once to match how your school collects enrolment information, then record each student’s responses by typing them in, importing an Excel file, or collecting answers through a Microsoft Forms survey. The profile holds everything from NAPLAN and academic results to learning support, medical, and office-use information.
In this article
Detailed Guide
Importing future students
Opening the enrolment interview profile
Adding a new student
Recording interview data
Importing responses from a Microsoft Forms survey
Filling in the profile
Reference
Sharing and using the profile
Setting up your labels
Before you run any interviews, set the labels up so the form matches the way your school collects enrolment information. Go to the Settings page and open Data Collection Headings, then find the Enrolment Interview section.
From there you can label the student summary area, the student profile area, diagnostics and programs, and the office-use-only flags, and set your load options and feeder school list. TrackEd comes with example labels, so you can start from those and adjust them to your use case.
Importing future students
If you are using enrolment interviews for the move from primary to secondary, bring next year’s students in first so each one starts with a basic profile to build on. Importing future students adds those incoming cohorts through the standard Student Summary import; once they are in TrackEd, you can open an enrolment interview for each student and add to it as you go.
Opening the enrolment interview profile
The enrolment interview is one of TrackEd’s alternative profile layouts. Open a student’s profile and choose Enrolment Interview from the purple alternative profile list at the right edge of the page, and the one-page form opens showing the labels you set up.
If you change your label settings after student records already exist, press the Update Labels button. It applies your current settings to the existing list of students, so the new labels show on profiles that were created earlier.
Adding a new student
You can also create a new student and fill in the enrolment interview from scratch, rather than starting from an imported record.
Recording interview data
There are three ways to get responses into the profile:
- Type directly into the fields on the form.
- Export an Excel file and fill it in, which suits interviews done offsite, then bring it back through the enrolment interview import.
- Print a blank form, fill it in by hand, and type the answers up later.
The enrolment interview import sits in the Data Collection tab of TrackEd’s import system.
Importing responses from a Microsoft Forms survey
Added in 2024, the Enrolment Survey lets you collect responses through Microsoft Forms and import them onto the enrolment interview profile. You build a survey of up to 13 questions, and on import each question maps to a fixed field on the profile. You can word the questions however you like in Forms and relabel them in TrackEd afterwards.
The survey needs Microsoft Forms, and either the student authenticates with an EQ login or you add an EQ email address to the Excel output afterwards. To run it:
- Create a Forms survey with up to 13 questions.
- Get responses to the survey.
- Save the responses to Excel from Forms. It should look like this:

- Import using the Enrolment Survey import in the Data Collection tab. It matches on student MIS in column D, so you may need to enter some students manually if you used an anonymous survey.
Filling in the profile
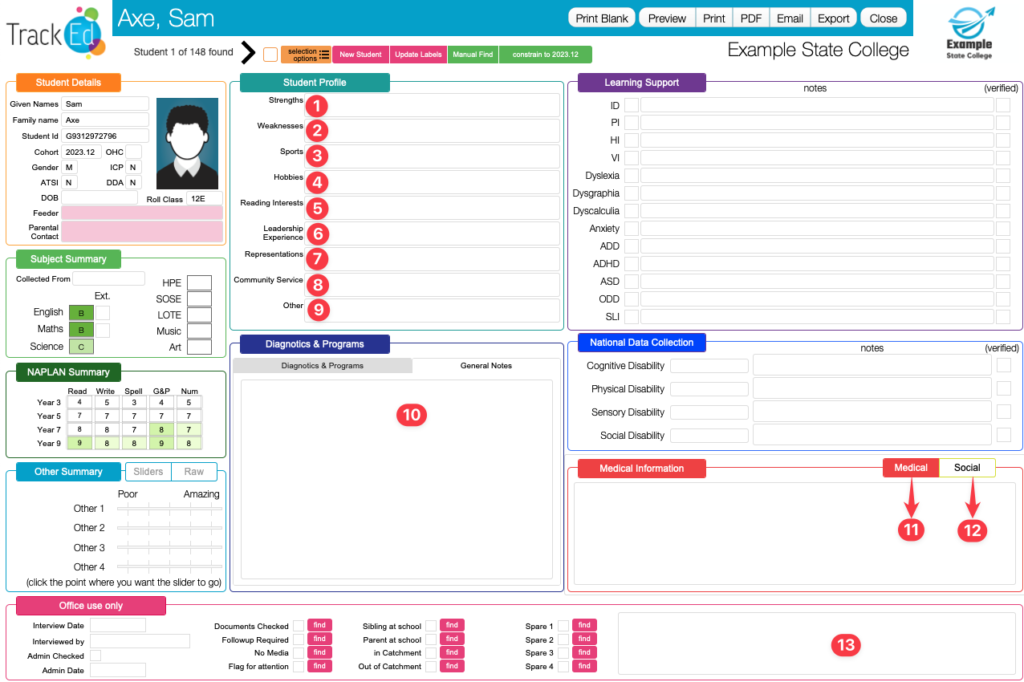
You can complete as much of the profile as your school needs. Two things are easy to miss: in the Learning Support and National Data Collection areas, it is the Verified checkbox that counts, not the tick on the entry side; and the Medical Information tab can be switched to a Social Interactions tab, where you record students to keep together or keep apart for class formation.
NAPLAN can be recorded on the slider bars or as raw scores if you run pre-entry exams. The Office Use Only flags each have a find button, so you can later search for every student with a flag ticked, such as everyone marked for follow-up. The table below lists what each section of the profile records.
Reference
Enrolment interview profile sections
The sections that make up the one-page profile, and what you record in each. The exact labels depend on what you set up under Data Collection Headings.
| Section | What you record there |
|---|---|
| Student summary | Subject grades and a LOTE language, as a snapshot of where the student is. |
| NAPLAN summary | NAPLAN results on the slider bars, or raw scores from pre-entry exams. |
| Student profile | Strengths, weaknesses, and sports, set up for your school’s needs. |
| Diagnostics and programs | Extension or support programs, or general notes if you relabel it. |
| Learning support | Learning support categories, each with its own Verified checkbox. |
| National Data Collection | Strategy levels, with notes and a Verified checkbox. |
| Medical Information / Social Interactions | Medical details, or students to keep together or apart when forming classes. |
| Office Use Only | Flags such as documents checked, follow-up required, no media, sibling at school, and in or out of catchment, each with a find button. |
Sharing and using the profile
Once an enrolment interview is filled in, it prints like any other A4 profile, so you can save it as a PDF or email it to staff. The information you collect also feeds later steps: the social notes flow into Class Builder when you form classes, and the office-use flags help you find the students who still need follow-up.
Frequently Asked Questions
Q: Where do I set up the enrolment interview labels?
A: On the Settings page, open Data Collection Headings and find the Enrolment Interview section. You can label the summary, profile, diagnostics, and office-use areas there, and set your load options and feeder school list.
Q: I changed the labels but existing students still show the old ones. Why?
A: Press the Update Labels button. It applies your current settings to the existing list of students, so changes made after records were created show on their profiles.
Q: A student I added created a duplicate after a OneSchool import. What happened?
A: Enter the student ID when you create the student. Without it, the first OneSchool import treats them as new and creates a second record.
Q: How do I collect interview data without typing each one in?
A: Export the Excel template, fill it in (this can be done offsite), and use the enrolment interview import. You can also collect answers through a Microsoft Forms enrolment survey, or print blank forms and type the answers up later.
Q: Can I collect responses with Microsoft Forms?
A: Yes. Build a Forms survey of up to 13 questions, which map onto the profile on import, then bring the responses in with the Enrolment Survey import in the Data Collection tab. It matches on student MIS in column D.
Q: How do I find every student flagged for follow-up?
A: The Office Use Only flags each have a find button. Click the find button next to a flag, such as follow-up required, to search for all students with it ticked.
Legacy Content